Table of Contents
Understanding how to put winch in free spool is a fundamental skill for anyone who relies on a winch for off-road recovery, industrial work, or marine applications. The free spool function is your gateway to efficient winch operation, allowing for quick and effortless cable or rope deployment without draining your battery or straining the winch motor. When you disengage the clutch to activate free spool, you’re mechanically separating the winch drum from the powerful gear train and motor, enabling it to spin freely. While this might sound straightforward, improper use can lead to equipment damage or serious safety hazards. This comprehensive guide will walk you through not only the step-by-step process of engaging and disengaging free spool but also the critical safety practices, practical applications, and troubleshooting tips you need to master this essential function. Whether you’re preparing for a recovery on the trail or setting up for a pull on a job site, knowing how to properly manipulate your winch’s clutch mechanism is the first step to safe and effective operation.
Understanding Free Spool: What It Is and Why It Matters
Before you reach for that clutch lever, it’s crucial to understand what’s happening inside your winch when you activate the free spool function. This knowledge isn’t just theoretical—it’s the foundation for safe and effective operation.
Defining Free Spool
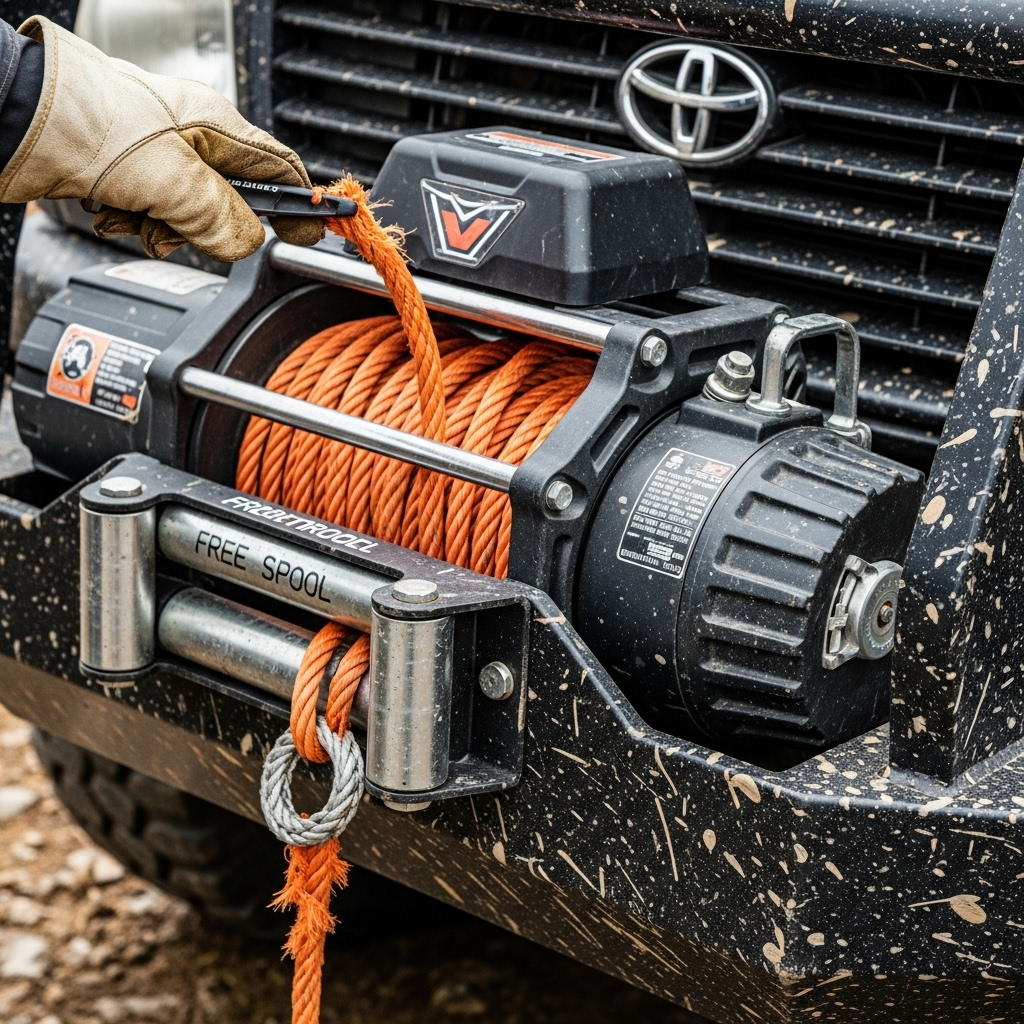
In simplest terms, free spool is a winch mode that disengages the motor and gear system from the drum. This allows the drum to rotate freely, meaning you can pull the cable or synthetic rope out by hand with minimal resistance . It’s a purely mechanical function, requiring no power from your vehicle’s battery or the winch motor itself.
This is distinctly different from “power-out,” where you use the winch’s remote control to command the motor to unwind the cable. Power-out consumes electricity and is typically used for more controlled letting-out of the line under light load. Free spool, on the other hand, is designed for speed and efficiency when you need to get your hook to an anchor point quickly .
The Mechanical Magic Inside
The heart of the free spool function is the clutch. This is typically a mechanical lever or knob located on the side of the winch. When you move the clutch into the free spool position, you are physically shifting internal components to separate the winch drum from the planetary gear train .
Think of it like the clutch in a manual transmission vehicle: when you press the clutch pedal, you disconnect the engine from the wheels, allowing the car to coast. Similarly, the winch clutch disconnects the powerful motor and gearing from the drum, letting it spin independently. This is why the handle becomes so easy to turn—you’re no longer fighting against the entire gear reduction system .
Key Benefits of Using Free Spool
Leveraging the free spool function correctly offers several key advantages in the field:
- Speed and Efficiency: The primary benefit is rapid line deployment. You can quickly pull out dozens of feet of rope to reach a distant anchor point in seconds, far faster than using the power-out function .
- Battery Conservation: Because it doesn’t use the winch motor, free spooling places zero drain on your vehicle’s electrical system. This preserves precious battery power for the actual pulling operation .
- Motor Preservation: Using free spool instead of power-out for long deployments reduces heat buildup and wear on the winch motor, extending its overall lifespan .
- Control and Precision: Manually pulling the line gives you a better feel for the process, allowing you to precisely place the hook and avoid tangles or snags that can occur with power-out.
Table: Free Spool vs. Power-Out – A Quick Comparison
Safety First: Non-Negotiable Precautions Before Free Spooling
Winching involves tremendous forces, and safety must always be your top priority. The free spool function, while simple, introduces specific hazards that must be managed. Ignoring these protocols can lead to equipment failure, vehicle damage, or severe personal injury.
Essential Personal Protective Equipment (PPE)
Never operate a winch or handle its line without proper protection. The minimum required PPE includes:
- Heavy-Duty Gloves: Always wear leather or other heavy-duty gloves when handling the winch rope or cable . Steel cable can develop nearly invisible broken strands that act like razor blades, and synthetic rope can generate severe rope burns if it slips through your hands. Gloves are your first line of defense.
- Eye Protection: Safety glasses or goggles are essential to protect your eyes from flying debris, dirt, or rust that may dislodge from the rope or winch during handling .
The Golden Rule: Never Free Spool Under Load
This is the most critical safety rule regarding free spool. Never, under any circumstances, attempt to move the clutch lever into or out of free spool when there is tension on the winch rope .
The winch clutch is designed to be operated only when the drum is free to rotate. Trying to disengage it under load places immense stress on the clutch components and can cause:
- Sudden, Uncontrolled Release: The load could release catastrophically, causing the rope to whip and the vehicle or load to drop.
- Clutch Failure: The internal mechanism can break, rendering your winch inoperable.
- Serious Injury: The sudden release of energy can cause hooks, shackles, or the rope itself to become dangerous projectiles.
If you need to release tension to adjust the clutch, slowly power-in until the load is secure, or use a controlled power-out to lower the load before attempting to disengage the clutch.
Establishing a Safety Zone
Before you begin, ensure all bystanders are clear of the area. A good rule is to keep everyone at least 1.5 times the length of the extended winch rope away . Never allow anyone to step over a winch line, whether it’s under tension or not . Clearly communicate your intentions to anyone assisting you so everyone knows what to expect during the operation.
Pre-Operation Winch Inspection
A quick but thorough inspection before each use can prevent failures. Check the following:
- Winch Rope/Cable: Look along the entire length for fraying, kinks, broken strands (on wire rope), or cuts and abrasions (on synthetic rope) .
- Hook and Latch: Ensure the hook is not bent or distorted and that the safety latch opens and closes properly .
- Clutch Mechanism: Operate the clutch lever without tension to ensure it moves smoothly between its positions.
- Fairlead: Check that the roller or hawse fairlead is secure and free of burrs or damage that could snag the rope.
Step-by-Step Guide: How to Put Winch In Free Spool

Now that you understand the fundamentals and safety protocols, let’s walk through the precise steps for engaging and using free spool. The exact location of the clutch may vary by winch model and vehicle installation, but the core process remains consistent.
Locating the Clutch Mechanism
The first step is to find the clutch control on your winch. This is typically a lever or a rotary knob located on the side of the winch itself.
- Common Location: On many vehicle winches, the clutch is found on the driver’s side of the winch (the left side when facing the front of the vehicle) .
- Potential Challenges: Some winch installations, particularly “hidden” or low-profile mounts, can make the clutch difficult to access. You may need to remove a grille or access panel. Consult your vehicle and winch mount instructions if you cannot easily see or reach the clutch lever.
The Free Spool Engagement Procedure
Once you’ve located the clutch and performed your safety checks, follow this procedure:
- Release Existing Tension: If the winch rope is under any tension (even just the tightness of being spooled), you must release it before operating the clutch. Briefly use the “power-out” function on your remote control for just a second or two to create slack. Never try to disengage the clutch under load .
- Move the Clutch Lever: Firmly and deliberately move the clutch lever from the “ENGAGED” or “LOCKED” position to the “FREE SPOOL” or “DISENGAGED” position. On most winches, this involves pulling the lever out and rotating it 90 degrees.
- Confirm Disengagement: You should feel a distinct change in resistance. When the clutch is successfully disengaged, you will be able to pull the winch rope out by hand with minimal effort. The drum will spin freely.
Pulling and Deploying the Rope
With the winch now in free spool, you can deploy the rope:
- Use the Hook Strap: Always use the provided hook strap to handle the hook. Never place your fingers through the hook itself .
- Pull Smoothly: Walk back from the vehicle, pulling the rope smoothly and evenly. Try to maintain a small amount of tension on the rope to prevent it from becoming loose and tangled, which can lead to overwrapping and damage when spooling back in .
- Leave Five Wraps: A critical safety rule is to never spool out the rope to the point where fewer than five wraps of rope remain on the drum. The drum attachment point is not designed to hold a load, and the rope could detach completely if you winch with fewer than five wraps .
Re-Engaging the Clutch for Winching
Once your hook is securely attached to the anchor point, it’s time to prepare for pulling:
- Check the Connection: Double-check that your hook is properly secured to the shackle or tree strap, and that the hook latch is closed.
- Re-engage the Clutch: Move the clutch lever firmly back to the “ENGAGED” or “LOCKED” position. This reconnects the drum to the gear train and motor, allowing the winch to pull.
- Take Up Slack: Using the remote control, slowly “power-in” to remove all slack from the rope. Once tension is applied, stop and do a final check of all connections and the rope path before beginning the full pull.
Practical Applications and Best Practices for Free Spool
Knowing the steps is one thing; understanding when and why to use free spool in real-world situations is what makes a proficient winch operator. This function is not just for initial setup—it’s a tool you’ll use repeatedly during a recovery.
Optimal Use Cases for Free Spool
- Initial Recovery Setup: The most common use is at the very beginning of a recovery. Instead of slowly powering out dozens of feet of rope, draining your battery, and heating the motor, you can quickly free spool the rope to your anchor point in a fraction of the time .
- Repositioning During a Pull: In a complex recovery, you may need to reposition your anchor point or change your rigging. After safely unloading the winch rope (often by securing the load and powering out slightly), you can disengage the clutch to manually pull out more rope or take in slack as needed.
- Respooling the Rope: After a recovery, it’s vital to rewind the rope neatly and under tension. The process often involves free spooling to adjust the starting point before using the winch motor under load to create tight, even layers on the drum .
The Critical “First Spooling” After Installation
If you have a new winch or a new synthetic rope, a specific initial procedure must be followed that heavily relies on free spool. This “first spooling” pre-tensions and sets the rope on the drum to prevent future problems.
- Find a Level Area: Park on a flat, level surface.
- Free Spool the Rope: Disengage the clutch and pull out the entire length of the rope until only the last five wraps remain on the drum .
- Re-engage and Anchor: Engage the clutch. Attach the hook to a solid, immovable anchor point (like a large tree).
- Create Light Load: Back your vehicle away from the anchor until the rope is taut, creating a light load (at least 1,000 lbs for wire rope) .
- Spool In Under Load: With the vehicle in neutral and your foot on the brake, use the remote to power-in the rope, spooling it back onto the drum under this initial load. This stretches the rope and ensures it wraps tightly, preventing inner layers from being pinched and deformed when under heavy pull later .
Advanced Technique: Using a Snatch Block
A snatch block (pulley) is a powerful accessory that can double your winch’s pulling power or change the direction of a pull. Free spool is essential when setting up a double-line pull with a snatch block:
- Free spool enough rope to reach your anchor point and then back to your vehicle.
- Attach the snatch block to the anchor.
- Run the winch rope through the snatch block and bring the hook back to a secure point on your own vehicle’s frame.
- Re-engage the clutch and begin winching. This setup halves your line speed but doubles your pulling power.
Troubleshooting Common Free Spool Problems
Even with proper procedure, you may encounter issues. Here’s how to diagnose and resolve common free spool problems.
Clutch Lever is Stuck or Hard to Move
- Cause #1: Tension on the Drum: This is the most common cause. Even a small amount of tension from the rope being tightly wound can bind the clutch.
- Solution: Use the remote to “power-out” for one or two seconds to create slack. This should release the binding and allow the clutch to move freely .
- Cause #2: Corrosion or Dirt: Winches are exposed to the elements and can corrode internally, or dirt and grit can jam the mechanism.
- Solution: Try working the lever back and forth gently. If it doesn’t free up, the winch may need to be serviced or cleaned by a professional.
Rope Doesn’t Pull Out Freely in Free Spool
- Cause #1: Clutch Not Fully Disengaged: The clutch lever may not have been moved completely to its stop.
- Solution: Check that the clutch lever is fully in the “FREE SPOOL” position.
- Cause #2: Rope Binding: If the rope was spooled loosely on a previous pull, the outer wraps can sink into the inner layers, pinching the rope and preventing it from unspooling.
- Solution: You may need to use the “power-in” function with moderate force to tighten the layers and un-bind the rope before attempting to free spool again.
Rope Spools Unevenly During Recovery
This is a common issue that can damage your rope and winch if not addressed.
- Cause: Winching at an angle causes the rope to stack up on one end of the drum. If this stack becomes too large, it can damage the winch’s end plate or mounting platform .
- Solution: Stop winching immediately. Release tension and power the rope out. Then, slowly power it back in, guiding the rope by hand (with a gloved hand, from a safe distance of at least 12 inches) to encourage it to spool evenly across the drum . Repositioning your vehicle to achieve a straighter pull can also solve this.
Conclusion
Mastering how to put winch in free spool is more than just a mechanical action—it’s a critical skill that enhances your efficiency, preserves your equipment, and, most importantly, upholds the highest standards of safety during winching operations. By understanding the internal clutch mechanism, rigorously following the step-by-step safety protocols, and applying this knowledge in practical recovery scenarios, you transform from a simple winch owner into a competent and confident operator. Remember that the clutch is a powerful interface between you and the tremendous forces within your winch; treating it with respect and using it correctly ensures it will perform reliably when you need it most. Whether you’re on the trail, at the job site, or on the water, this fundamental skill is the cornerstone of effective winch use. Practice these procedures in a safe, controlled environment before you need them in an emergency, and always prioritize safety over speed.
Key Takeaways
- The free spool function disengages the winch drum from the gear train via a clutch lever, allowing for manual, battery-free rope deployment .
- Never operate the clutch lever when the winch rope is under tension; always release load first using controlled power-out to prevent mechanical failure and injury .
- Always wear heavy-duty gloves and eye protection when handling the winch rope or operating the clutch mechanism .
- For new winches or ropes, an initial spooling under load (at least 1,000 lbs) is essential to pre-stretch and set the rope, preventing future binding and damage .
- If the rope begins to stack unevenly during a pull, stop immediately, release tension, and re-spool to ensure even layering across the drum .
Sources
- Warn Industries – Basic Guide to Winch Techniques
- Overland Bound Forum – Initial “spooling” instructions for new winch
- Garlway Machinery – How Does A Winch Free Spool Work?
- Polaris Off-Road – Winch Guide
- Facebook – How to access free-spool lever and remote plug
- Stay The Trail – Winching Tips and Tricks
- Chicks On The Rocks – Winching Basics

