Table of Contents
Knowing exactly how to replace winch cable is a fundamental skill for any off-road enthusiast, boater, or equipment owner. A frayed, kinked, or damaged cable isn’t just an inconvenience; it’s a significant safety hazard waiting to fail. Whether you’re making the switch from heavy steel cable to modern synthetic rope or simply replacing a worn-out line, doing the job correctly is paramount for your safety and the performance of your gear. This comprehensive guide will walk you through every step of the process, from the essential safety preparations to the final, crucial step of respooling under load. We will cover the specific techniques for different types of winches and cables, ensuring you can tackle this maintenance task with confidence.
Why Proper Winch Cable Replacement Matters
Replacing your winch cable isn’t just about restoring function; it’s about ensuring safety and optimal performance. A worn cable can snap under load, and the whipping backlash of a broken steel cable is incredibly dangerous. Similarly, a synthetic rope that is improperly installed can chafe and fail when you need it most. A correctly installed and spooled new cable provides reliable strength, smooth operation, and peace of mind. Regular inspection and timely replacement are the best ways to prevent accidents and ensure your winch is always ready for the task at hand.
Safety First: The Non-Negotiable Precautions
Before you touch a single tool, internalizing these safety rules is the most important part of the process. Winches store immense energy, and a mistake can lead to severe injury.
- Wear Heavy-Duty Gloves: Always protect your hands. Steel cables can have sharp burrs from broken strands that can easily slice skin, and synthetic ropes can cause friction burns . Gloves are your first line of defense.
- Disengage Power: If your winch is electrically powered, disconnect the power source before starting any work to prevent accidental activation .
- Use Eye Protection: Wear safety glasses to protect your eyes from debris, metal fragments, or snapping components.
- Work in a Clear Area: Ensure you have a clean, well-lit workspace to avoid tripping hazards and keep tools organized.
- Never Guide Cable Under Tension with Your Hands: When respooling the final layers, keep your fingers clear of the loop and drum to avoid a crushing injury .
Understanding Your Winch System: Key Components
To replace the cable effectively, you need to understand the key parts you’ll be working with.
- Winch Drum: The cylindrical spool that the cable wraps around. It has a specific attachment point for the cable’s end.
- Fairlead: The guide that directs the cable onto the drum. Roller fairleads are common for steel cable, while smooth hawse fairleads are required for synthetic rope to prevent abrasion .
- Cable/Rope: The line itself, which can be steel cable or synthetic rope.
- Hook or Shackle: The endpoint attachment for connecting to a load.
Choosing Your Cable: Steel vs. Synthetic
The first major decision is what type of line to use. Each has distinct advantages and considerations.
Preparation and Tools You Will Need
Gathering the right tools before you start will make the process smooth and efficient.
- Essential Tools: Pliers, sockets and a wrench, Allen keys, and electrical tape .
- Cleaning Supplies: A wire brush and sandpaper for cleaning and deburring the winch drum if switching from steel to synthetic .
- New Fairlead (if needed): A new, smooth aluminum hawse fairlead is mandatory if you are switching from steel cable to synthetic rope .
- New Hook/Shackle (if needed): A soft shackle is recommended for use with synthetic rope to prevent damage to the eyelet .
How to Replace a Steel Winch Cable
This process applies to winches on vehicles, ATVs, and utility equipment.
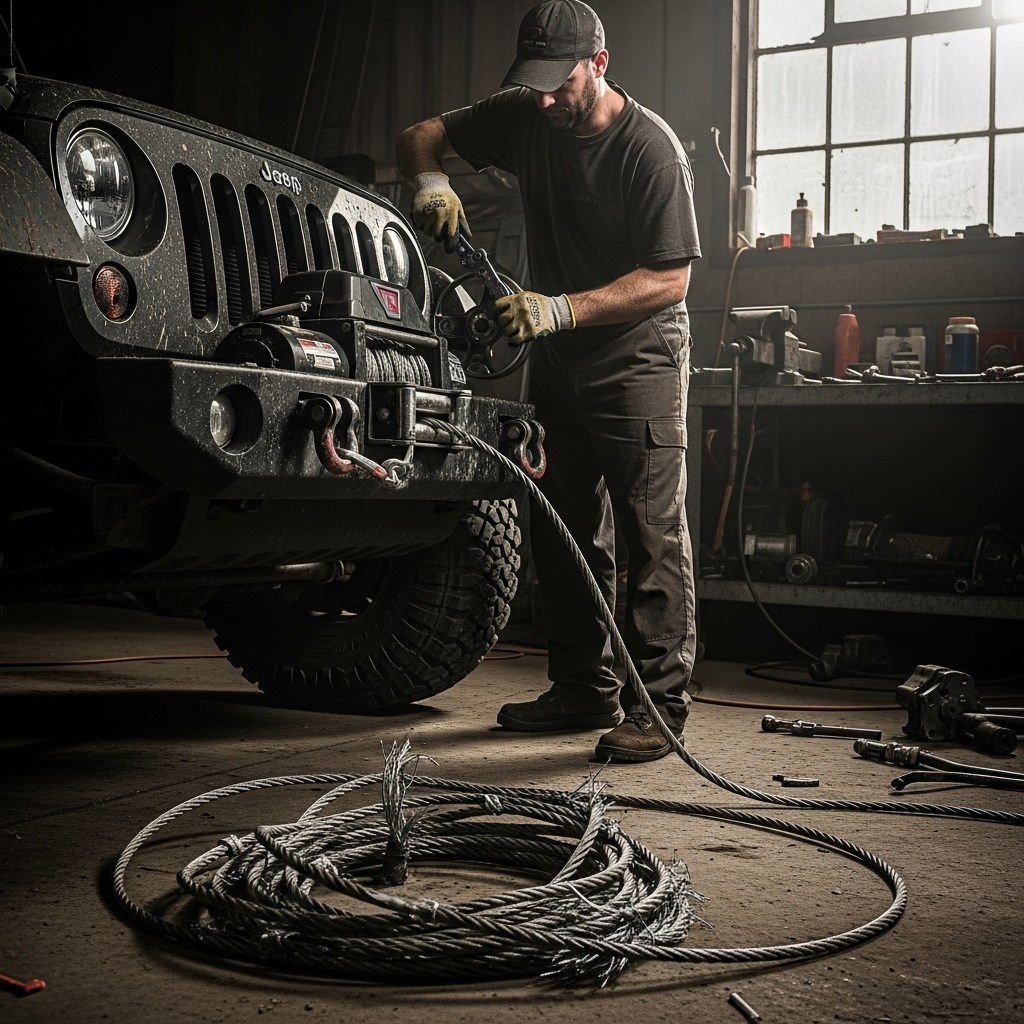
Step 1: Remove the Old Steel Cable
Begin by disengaging the winch’s clutch to put it in “freespool” mode . Unspool the entire old cable from the drum. At the drum, you will find the cable’s end secured by a panhead screw or a set screw . Use the appropriate tool, typically an Allen key, to loosen this screw and fully release the old cable from the drum .
Step 2: Prepare the Winch Drum
This is a critical inspection point. Look for any rust, sharp burrs, or grooves left by the old cable. If you are installing another steel cable, a quick clean with a wire brush is sufficient. If you are switching to synthetic rope, you must thoroughly sand the entire drum until it is completely smooth. Any sharp edge will cut into the synthetic fibers .
Step 3: Attach the New Steel Cable
Feed the end of the new steel cable through the fairlead and then into the anchor point on the drum. Secure it tightly using the same screw and method you used to remove the old one . Ensure the connection is very secure, as this is the foundation for the entire spooling process.
How to Replace with Synthetic Winch Rope
The process for synthetic rope has some key differences, primarily in how the rope is secured to the drum.
Step 1: Unspool and Remove the Old Rope
Place the winch in freespool and pull the entire old line out. For synthetic rope, the inner end is typically secured with a knot inside the drum . You will need to untie this knot to remove the old rope. If it’s glued or taped, you may need to cut the end .
Step 2: Critical Preparation for Synthetic Rope
This step cannot be skipped. As mentioned before, you must install a smooth aluminum hawse fairlead if one is not already present . You must also run your fingers along the entire rope path—including the drum flanges and any guides—to feel for any sharp spots or pinch points. Sand down any roughness you find .
Step 3: Attach the New Synthetic Rope to the Drum
There are two common methods for securing the rope to the drum:
- Eyelet Method: Some synthetic ropes come with a reinforced eyelet. If your winch drum uses a panhead screw, you can bolt this eyelet directly to the drum .
- Knot Method (Modified Shoemaker’s Knot): More commonly, you will feed the non-looped end of the rope through the hole in the drum and then tie a secure knot. A reliable method is the Modified Shoemaker’s Knot, which involves threading and burying the tail of the rope back into itself to create a secure, low-profile connection . Ensure the knot is tight and secure before proceeding.
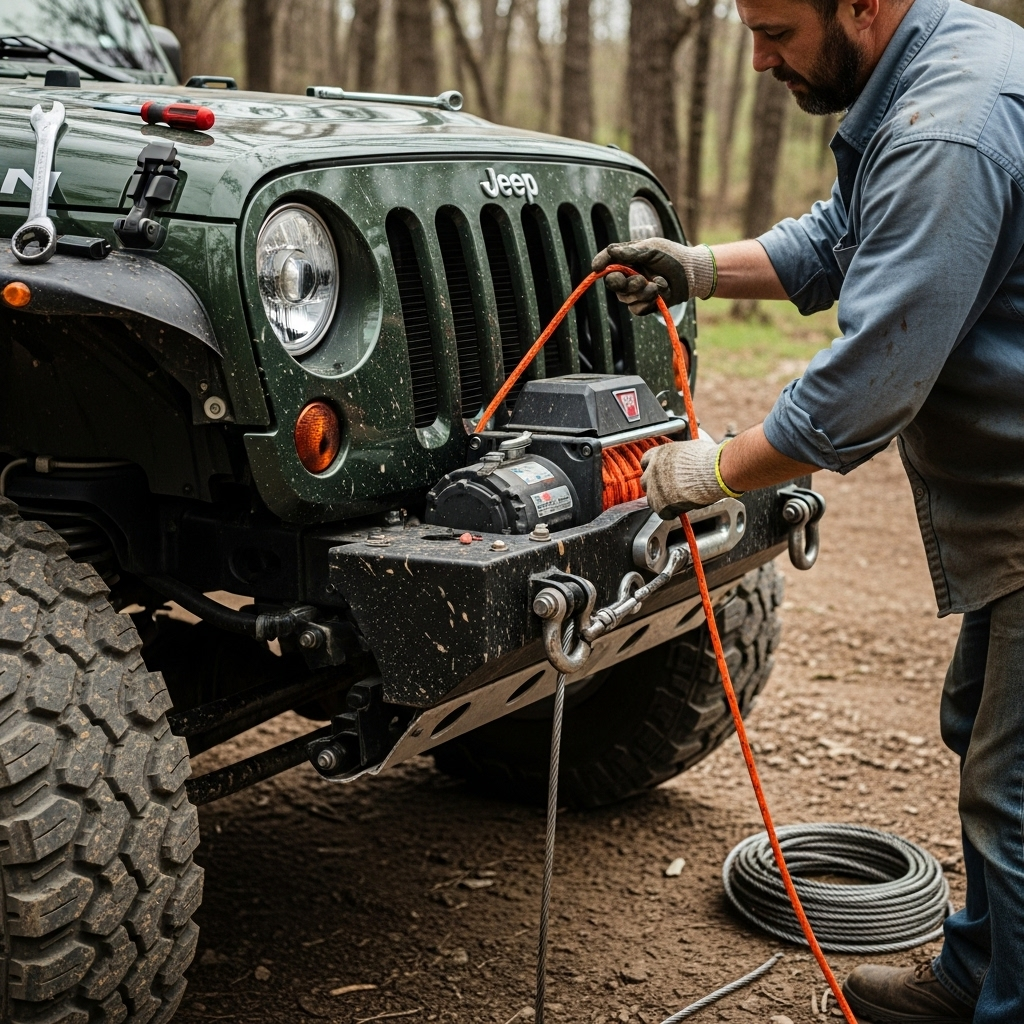
The Final Crucial Step: Respooling Under Load
Whether you’ve installed steel cable or synthetic rope, the respooling process is the same and is critical for proper future operation. Never spool a winch without a load, as this will result in loose, messy wraps that can bind and damage the cable under tension.
- Re-mount the Winch: If you removed the winch from your vehicle for easier access, now is the time to reinstall it .
- Route the Cable: Run the cable through the fairlead.
- Attach to a Heavy Load: Attach the hook to a solid, immovable anchor point like a tree (use a tree strap) or another vehicle.
- Apply Tension and Spool: Engage the winch clutch to the power-in direction. Slowly winch in the cable, keeping light tension on the line. Use a leather-gloved hand to guide the cable back and forth across the drum, ensuring each wrap sits neatly and tightly against the previous one. This creates even, layered spooling .
- Complete the Spooling: Continue this process until only a few wraps remain on the drum, leaving at least five to eight wraps as a safety margin. A tightly spooled winch is a reliable winch.
Troubleshooting Common Issues
- Cable Bunching on One Side: This is caused by improper guiding during spooling. Unspool and re-spool under load, carefully guiding the cable to create even layers.
- Synthetic Rope Shows Fuzz or Abrasion: Immediately inspect the fairlead and drum for sharp edges you may have missed. Address the sharp point to prevent further damage.
- Winch Motor Struggles with New Cable: Ensure the clutch is fully engaged. For synthetic rope, confirm it is not pinched somewhere in the system.
Post-Installation Maintenance and Inspection
Your job isn’t complete after the new cable is spooled. Regular maintenance is key to longevity and safety.
- For Steel Cable: Regularly lubricate the cable with a dedicated cable lubricant to prevent rust and maintain flexibility. Frequently inspect for broken wires, kinks, and rust.
- For Synthetic Rope: Keep it clean from dirt and grime. Regularly inspect for cuts, excessive fuzziness, and UV degradation.
Final Checklist for Winch Cable Replacement
- Gathered all necessary tools and safety gear (gloves, eye protection)
- Disconnected power to the winch
- Removed old cable/rope and inspected drum and fairlead
- For synthetic rope: installed a smooth hawse fairlead and deburred the drum
- Securely attached the new cable/rope to the drum
- Respooled the new line under load with proper guidance
- Performed a final visual inspection of the entire system
By following this definitive guide, you have not only learned a valuable maintenance skill but have also taken a major step in ensuring your safety and the reliability of your equipment. A correctly replaced and maintained winch cable is a trusted partner for all your recovery and lifting needs.


Detroit Axle - Front and Rear Shock Absorbers for 2007-2017 Jeep Wrangler, 2018 Wrangler JK 4 Complete Shock Absorber Assembly 2008 2009 2010 2011 2012 2013 2014 2015 2016 Replacement
$106.98 (as of April 5, 2026 05:20 GMT +00:00 - More infoProduct prices and availability are accurate as of the date/time indicated and are subject to change. Any price and availability information displayed on [relevant Amazon Site(s), as applicable] at the time of purchase will apply to the purchase of this product.)


OEM QUALITY 13" + 13" PARRATI Premium All-Season Windshield Wiper Blades (Set of 2)
$15.29 (as of April 4, 2026 10:10 GMT +00:00 - More infoProduct prices and availability are accurate as of the date/time indicated and are subject to change. Any price and availability information displayed on [relevant Amazon Site(s), as applicable] at the time of purchase will apply to the purchase of this product.)


Amazon Basics Microfiber Cleaning Cloths, Ultra Absorbent, Lint Free, Streak Free, Non-Abrasive, Reusable and Washable, 16" x 12", Blue/White/Yellow, Pack of 24
$9.59 (as of April 4, 2026 11:18 GMT +00:00 - More infoProduct prices and availability are accurate as of the date/time indicated and are subject to change. Any price and availability information displayed on [relevant Amazon Site(s), as applicable] at the time of purchase will apply to the purchase of this product.)


5 PLUS® 15+15 inch Silicone Windshield Wipers Replacement For 2017 2016 2015 2014 2013 2012 2011 2010 2009 2008 2007 JEEP Wrangler, Silicone Windshield Wipers With Water Repellent 15 inch wiper blade
$17.99 (as of April 4, 2026 10:11 GMT +00:00 - More infoProduct prices and availability are accurate as of the date/time indicated and are subject to change. Any price and availability information displayed on [relevant Amazon Site(s), as applicable] at the time of purchase will apply to the purchase of this product.)


KUST Windshield Sun Shade for 2017-2026 Tesla Model Y/Model 3 Sunshade Accessories (Fit 2025-2026 Model Y Juniper / 2024 Model 3 Highland) Upgraded Foldable Sunshade, Blocks UV Rays Keep Car Cool
$19.99 (as of April 4, 2026 11:18 GMT +00:00 - More infoProduct prices and availability are accurate as of the date/time indicated and are subject to change. Any price and availability information displayed on [relevant Amazon Site(s), as applicable] at the time of purchase will apply to the purchase of this product.)


Philoent Tire Inflator Portable Air Compressor for Car Tires with Gauge, 150PSI Fast Bike Air Pump for Auto, Motorcycle, Bicycle, Balls, Digital Tire Pump with LED Light, Auto Shut-Off
$19.99 (as of April 4, 2026 11:44 GMT +00:00 - More infoProduct prices and availability are accurate as of the date/time indicated and are subject to change. Any price and availability information displayed on [relevant Amazon Site(s), as applicable] at the time of purchase will apply to the purchase of this product.)


All-Purpose Stainless Steel Shower Squeegee for Shower Glass Door with 2 Adhesive Hooks, Bathroom Cleaner Tool Household Window Mirror Squeegee , Cleaning Tile Wall, Car, 10 Inch Silver
$9.99 (as of April 4, 2026 11:18 GMT +00:00 - More infoProduct prices and availability are accurate as of the date/time indicated and are subject to change. Any price and availability information displayed on [relevant Amazon Site(s), as applicable] at the time of purchase will apply to the purchase of this product.)


2026 Wireless CarPlay Adapter for iPhone & Android Auto Mini Wired to Wireless Apple Car Play Adapter Plug & Play Compatible for iPhone iOS 10+ Android 11+ with After 2016 Cars
$43.99 (as of April 4, 2026 11:49 GMT +00:00 - More infoProduct prices and availability are accurate as of the date/time indicated and are subject to change. Any price and availability information displayed on [relevant Amazon Site(s), as applicable] at the time of purchase will apply to the purchase of this product.)


Valvoline Advanced Full Synthetic SAE 0W-20 Motor Oil 5 QT
$26.97 (as of April 4, 2026 11:18 GMT +00:00 - More infoProduct prices and availability are accurate as of the date/time indicated and are subject to change. Any price and availability information displayed on [relevant Amazon Site(s), as applicable] at the time of purchase will apply to the purchase of this product.)