Table of Contents
Learning how to clean fuel pressure regulator components is an essential skill for any car enthusiast or DIY mechanic looking to maintain optimal engine performance without breaking the bank. The fuel pressure regulator is a critical component of your vehicle’s fuel delivery system, responsible for maintaining consistent fuel pressure to the injectors under all operating conditions. When this small but vital part becomes clogged with debris, varnish, or contaminants from fuel, it can wreak havoc on your engine’s performance, causing issues ranging from poor fuel economy and hesitation to complete engine stalling. This comprehensive guide will walk you through the entire process of identifying, removing, cleaning, and reinstalling your fuel pressure regulator, potentially saving you hundreds of dollars in repair bills while restoring your vehicle’s power and efficiency. Whether you’re a seasoned mechanic or a first-time DIYer, our detailed step-by-step instructions will give you the confidence to tackle this crucial maintenance task and breathe new life into your engine.
Understanding Your Fuel Pressure Regulator
Before diving into the cleaning process, it’s important to understand what a fuel pressure regulator is, what it does, and why it’s so critical to your engine’s performance and health.
What is a Fuel Pressure Regulator and What Does It Do?
The fuel pressure regulator is a valve-like device that manages the fuel pressure within your vehicle’s fuel rail. Its primary function is to maintain a consistent pressure differential across the fuel injectors, ensuring they receive fuel at the optimal pressure for proper atomization regardless of engine load, vacuum conditions, or fuel pump output variations. Most modern vehicles use vacuum-operated regulators that adjust fuel pressure based on engine load—increasing pressure under acceleration (when manifold vacuum is low) and decreasing pressure at idle or during deceleration (when manifold vacuum is high) .
Think of the fuel pressure regulator as the traffic cop of your fuel system. Without it, your fuel injectors would receive inconsistent fuel pressure, leading to an improper air-fuel mixture that can cause numerous driveability issues and potentially damage your engine over time. A properly functioning regulator ensures your engine receives the perfect air-fuel ratio for combustion under all operating conditions, which translates to better performance, improved fuel economy, and reduced emissions .
Types of Fuel Pressure Regulators
While all fuel pressure regulators serve the same basic function, they come in different designs depending on the vehicle and fuel system type:
- Return-Style Regulators: These are the most common type, featuring a fuel return line that sends excess fuel back to the gas tank. They constantly regulate pressure by bleeding off unneeded fuel.
- Returnless Regulators: Newer vehicles often use this design where the regulator is located in or near the fuel tank, eliminating the need for a return line.
- Mechanical Regulators: Use spring pressure and vacuum diaphragms to regulate fuel pressure (most common in older vehicles).
- Electronic Regulators: Controlled by the vehicle’s engine control unit (ECU) for more precise pressure control (common in newer vehicles).
The cleaning process we’ll focus on primarily applies to mechanical, return-style regulators, which are the most serviceable type for DIY maintenance.
Why Fuel Pressure Regulators Get Dirty and Need Cleaning
Over time, fuel pressure regulators accumulate debris from multiple sources. Contaminants in fuel, microscopic metal particles from wearing fuel pumps, and varnish from old gasoline can all find their way into the regulator . Many car owners ignore this component until it starts causing noticeable problems, often mistaking the symptoms for more serious issues like fuel pump failure .
Ethanol-blended fuels, now standard in most gasoline, can be particularly problematic as ethanol acts as a solvent, dislodging deposits elsewhere in the fuel system that then travel to and clog the regulator . Regular cleaning as part of your maintenance routine can prevent these issues and extend the life of your entire fuel system.
Symptoms of a Dirty or Failing Fuel Pressure Regulator
Recognizing the signs of a clogged or malfunctioning fuel pressure regulator is the first step in diagnosing whether cleaning is needed. Many of these symptoms overlap with other fuel system issues, which is why proper testing is crucial before beginning any repair.
Performance Issues and Driveability Problems
- Engine Hesitation and Stumbling: A dirty regulator can’t maintain proper fuel pressure, leading to lean conditions (insufficient fuel) when you accelerate, causing the engine to hesitate or stumble .
- Rough Idling and Stalling: If the regulator provides inconsistent pressure at idle, you may experience rough idling or even stalling, particularly when coming to a stop .
- Power Loss Under Load: You might notice a significant loss of power when climbing hills or attempting to pass other vehicles, as the regulator fails to increase fuel pressure appropriately under load.
- Engine Misfires: Both rich and lean conditions caused by a faulty regulator can lead to misfires, as the improper air-fuel ratio prevents proper combustion .
Fuel Efficiency and Starting Issues
- Decreased Fuel Economy: A regulator stuck in the “open” position can cause excessively rich mixture (too much fuel), dramatically reducing your gas mileage .
- Black Smoke from Exhaust: An overly rich fuel mixture resulting from a malfunctioning regulator leads to unburned fuel exiting through the exhaust system as black smoke .
- Hard Starting: Difficulty starting, especially when the engine is warm, can indicate a regulator that’s not maintaining proper residual fuel pressure when the engine is off .
Emissions and Other Telltale Signs
- Fuel Odors: You may notice a strong gasoline smell, particularly if the regulator’s diaphragm has ruptured and is leaking fuel into the vacuum line .
- Fuel Leaks: Visible fuel leaks around the regulator body or fuel rail connection indicate seal failure or cracks in the housing.
- Failed Emissions Test: Both rich and lean conditions caused by a faulty regulator will increase harmful emissions, potentially causing your vehicle to fail emissions testing.
Table: Fuel Pressure Regulator Symptom Comparison
| Symptom | Likely Cause | Other Possible Causes |
|---|---|---|
| Black smoke from exhaust | Regulator stuck closed (rich condition) | Faulty injectors, bad oxygen sensor |
| Engine hesitation during acceleration | Regulator not increasing pressure under load | Clogged fuel filter, weak fuel pump |
| Hard starting | Regulator not maintaining residual pressure | Weak battery, failing starter, fuel pump check valve |
| Poor fuel economy | Regulator stuck open (rich condition) | Dirty injectors, underinflated tires, dragging brakes |
| Rough idle | Inconsistent fuel pressure at idle | Vacuum leaks, dirty throttle body, spark plug issues |
Preparation for Cleaning Your Fuel Pressure Regulator
Proper preparation is crucial for both safety and success when cleaning your fuel pressure regulator. Rushing this stage can lead to accidents, damaged components, or an incomplete repair.
Safety First: Essential Precautions
Working with fuel systems presents several hazards that must be managed carefully:
- Work in a Well-Ventilated Area: Always perform fuel system work outdoors or in a garage with doors open to prevent accumulation of flammable fumes .
- Eliminate Ignition Sources: Ensure no open flames, sparks, or smoking materials are anywhere near your workspace.
- Wear Appropriate Safety Gear: Use safety glasses to protect your eyes from fuel spray and chemical cleaners, and wear chemical-resistant gloves to protect your skin .
- Fire Extinguisher Readiness: Keep a Class B (flammable liquids) fire extinguisher nearby and ensure you know how to use it.
- Relieve Fuel System Pressure: This critical step prevents pressurized fuel from spraying when you disconnect the regulator. The specific procedure varies by vehicle but typically involves removing the fuel pump fuse or relay and running the engine until it stalls .
- Disconnect the Battery: To prevent accidental sparks or engine cranking during the procedure, disconnect the negative battery terminal before beginning work .
Tools and Materials You’ll Need
Gathering the right tools before starting will make the process smoother and prevent interruptions:
- Basic Hand Tools: Set of wrenches, sockets, screwdrivers, and Torx bits (if needed for your specific vehicle)
- Fuel Line Disconnect Tools: Special plastic tools designed to safely disconnect spring-lock fuel line fittings without damage
- Clean Rags or Shop Towels: For wiping up spills and cleaning components
- Container for Fuel: A small approved container to capture any spilled fuel
- O-Ring Pick or Dental Pick: Useful for carefully removing old seals without damaging mating surfaces
- New O-Rings and Seals: Always replace seals with new ones—never reuse old fuel system seals
- Cleaning Solvent: Commercial fuel system cleaner, carburetor cleaner, or fresh gasoline for cleaning components
- Compressed Air (Optional): For blowing out passages after cleaning
- Fuel Pressure Gauge (Optional but Recommended): For testing regulator function before and after cleaning
Locating Your Fuel Pressure Regulator
The location of the fuel pressure regulator varies by vehicle make and model:
- Most Vehicles: Look for a small, round metal device attached to the fuel rail with one or two fuel lines and a small vacuum hose connected to it.
- Return-Style Systems: Typically mounted on the fuel rail with a return line leading back to the fuel tank.
- Returnless Systems: Often located in or near the fuel tank, making them less accessible for cleaning.
- Specific Models: Consult your vehicle’s service manual for the exact location, which can save significant time during disassembly.
Some regulators are easily accessible on top of the engine, while others may require removal of intake components or other parts for access. Online vehicle-specific forums can be excellent resources for location information and tips from those who’ve done the job before .
Step-by-Step Guide: How to Clean Fuel Pressure Regulator
Now that you’re prepared with the necessary knowledge, tools, and safety precautions, it’s time to dive into the actual cleaning process. Follow these steps carefully for the best results.
Step 1: Relieving Fuel System Pressure
This critical safety step must not be skipped:
- Locate the fuel pump fuse or relay in your vehicle’s fuse box (consult your owner’s manual).
- With the engine running, remove the fuse or relay—the engine will stall as residual fuel pressure is depleted.
- Crank the engine briefly (2-3 seconds) to ensure all pressure is relieved.
- Disconnect the negative battery terminal to prevent accidental starting during the procedure.
Step 2: Removing the Fuel Pressure Regulator
The removal process varies by vehicle, but generally follows this sequence:
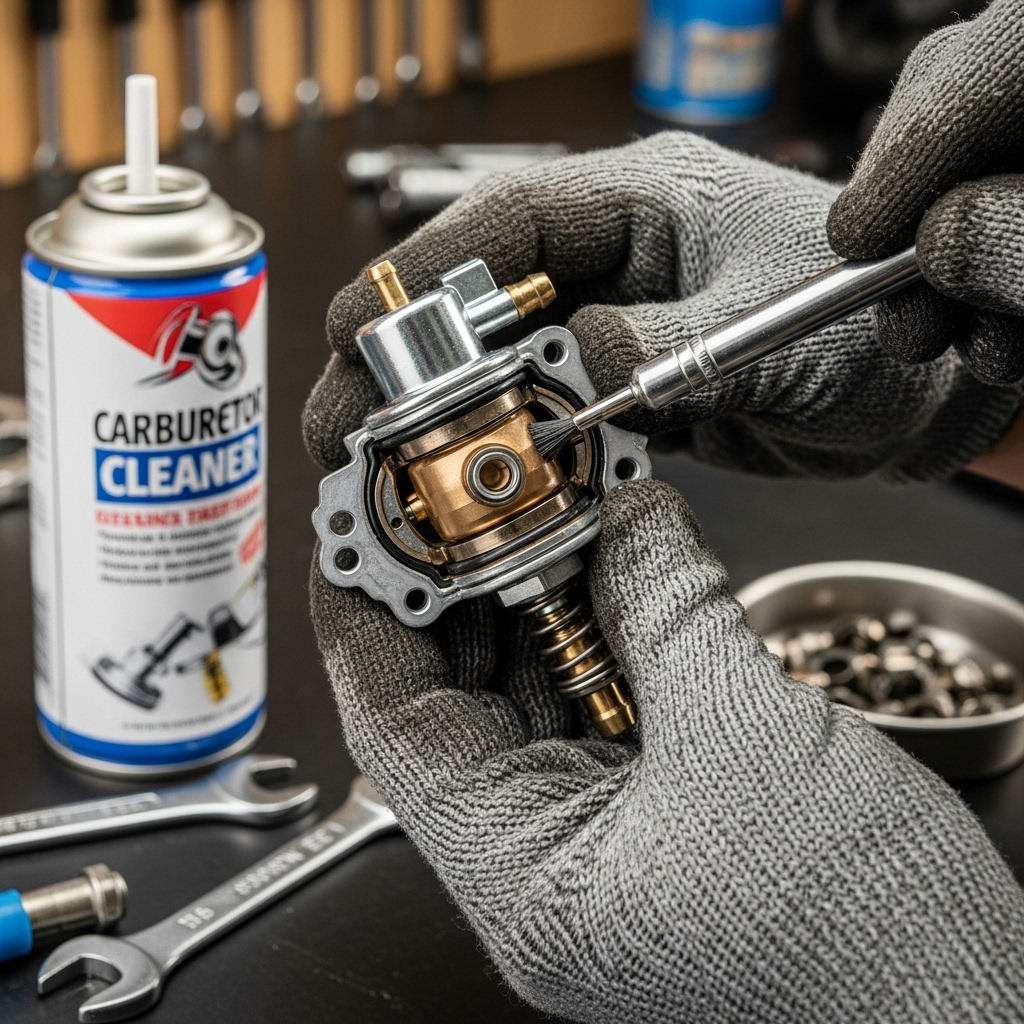
- Clean the Work Area: Use a degreaser to clean around the regulator and fuel rail connections to prevent contamination of the fuel system .
- Disconnect the Vacuum Line: Carefully remove the small vacuum hose from the top of the regulator.
- Disconnect Fuel Lines: Use appropriate fuel line disconnect tools to safely remove the fuel supply and return lines from the regulator. Have rags ready to catch any residual fuel.
- Remove Mounting Hardware: Unbolt or unscrew the regulator from the fuel rail or its mounting bracket. Some models use Torx bolts, so have the correct bits available .
- Extract the Regulator: Gently pull the regulator from its seat, being careful not to damage the mounting surface or drop any small components.
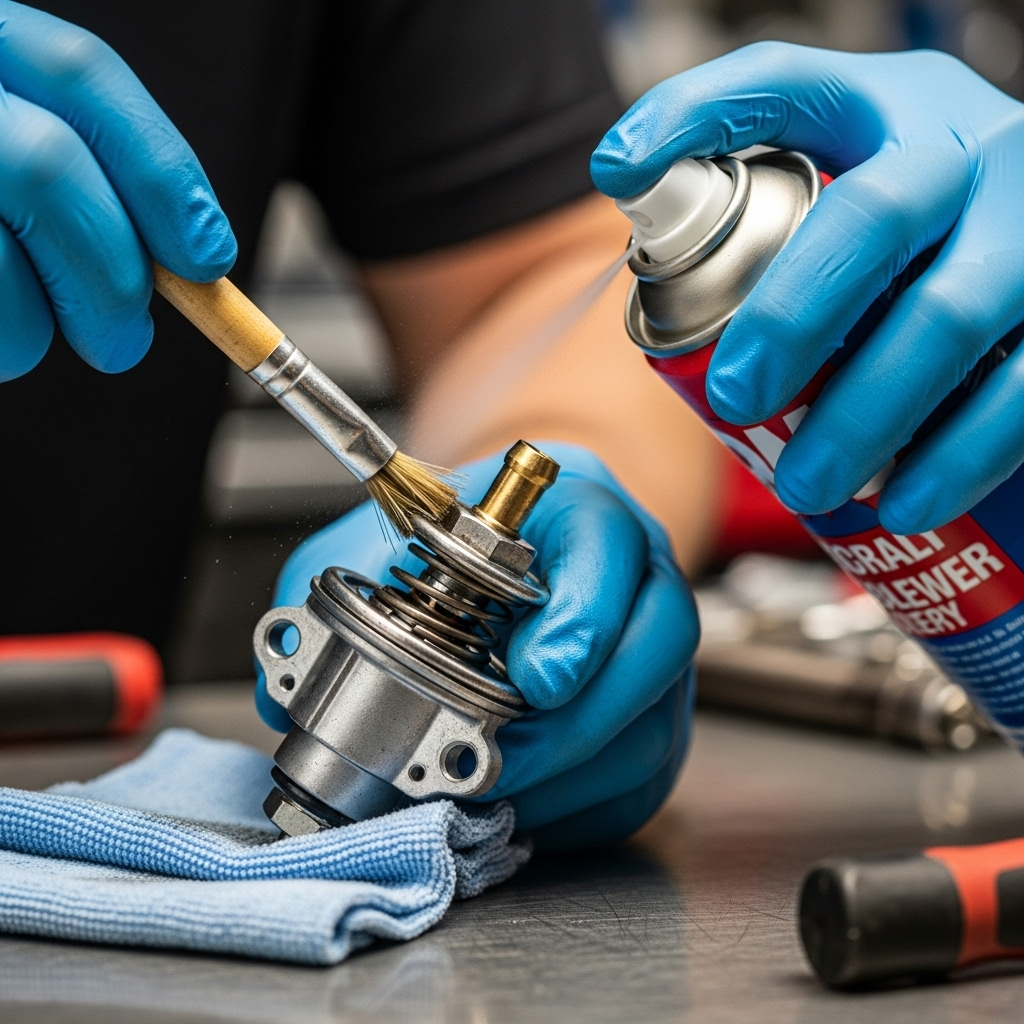
Step 3: Disassembling and Cleaning the Regulator
Some regulators can be partially disassembled for more thorough cleaning, while others must be cleaned as a unit:
- Initial Inspection: Examine the regulator for obvious damage, cracks, or heavy corrosion that might necessitate replacement rather than cleaning.
- Remove O-Rings and Seals: Carefully take off all seals using a pick tool, noting their positions for reassembly .
- External Cleaning: Wipe the exterior of the regulator with a clean cloth to remove surface grime .
- Internal Cleaning:
- For disassemblable units: Carefully take apart the internal components, noting their order and orientation.
- Use a dedicated fuel system cleaner or carburetor cleaner to spray through all passages and orifices.
- For heavily clogged units, soak components in cleaner for 15-30 minutes to dissolve stubborn deposits.
- Use compressed air to blow out all passages thoroughly, ensuring they’re completely clear .
- Diaphragm Check: If accessible, inspect the regulator’s diaphragm for tears, holes, or stiffness. A damaged diaphragm requires regulator replacement, as it cannot be repaired.
Step 4: Reinstalling the Fuel Pressure Regulator
Proper reassembly is crucial to prevent leaks and ensure correct operation:
- Install New Seals: Lubricate new O-rings and seals with a small amount of clean engine oil or Vaseline before installation—never install dry seals as this can damage them and cause leaks .
- Position the Regulator: Carefully place the regulator back into its mounting location, ensuring it seats properly.
- Reconnect Fuel Lines: Secure all fuel line connections, listening for audible “clicks” on quick-connect fittings to ensure proper engagement.
- Reattach Vacuum Line: Connect the vacuum hose to its port on the regulator.
- Reinstall Mounting Hardware: Tighten bolts or screws to the manufacturer’s specified torque (if available), being careful not to overtighten.
Step 5: Post-Installation Testing and Verification
Before considering the job complete, verify your work:
- Reconnect the Battery: Reattach the negative battery terminal.
- Reinstall Fuel Pump Fuse/Relay: Return the fuel pump fuse or relay to its original location.
- Pressurize the System: Turn the ignition key to the “ON” position (without starting the engine) for a few seconds to pressurize the system. Check for any fuel leaks at all connection points.
- Start the Engine: The engine may take slightly longer to start as the system reprimes. Listen for abnormal noises and check again for leaks once running.
- Test Drive: Take the vehicle for a test drive, paying attention to previous symptoms like hesitation or stumbling to verify the cleaning resolved the issues.
Alternative Cleaning Methods and Maintenance
For those who prefer less invasive approaches or want to maintain their regulator between thorough cleanings, several alternatives exist.
Fuel Additive Cleaning Method
Fuel system cleaning additives can help maintain a clean regulator and address minor contamination:
- How It Works: Additives are poured directly into the fuel tank, where they mix with gasoline and circulate through the entire fuel system, gradually dissolving deposits .
- Effectiveness: Best for preventive maintenance or very mild cases—not effective for seriously clogged regulators .
- Application: Add to your fuel tank when approximately one-quarter full, then fill up with gasoline to ensure proper mixing .
- Frequency: Many mechanics recommend using a quality fuel injector cleaner every 3,000-5,000 miles as preventive maintenance .
Professional Cleaning Options
For complex situations or if you’re uncomfortable with DIY approaches:
- Professional Fuel System Service: Many repair shops offer complete fuel system cleaning services that include the regulator, using specialized equipment and chemicals .
- Ultrasonic Cleaning: For removed regulators, ultrasonic cleaning uses high-frequency sound waves in a specialized solution to remove even stubborn deposits from internal components .
Preventive Maintenance Strategies
Preventing regulator contamination is easier than dealing with the consequences:
- Regular Fuel Filter Changes: A clean fuel filter traps contaminants before they reach the regulator and injectors. Follow your manufacturer’s recommended replacement interval, typically every 30,000-50,000 miles .
- Quality Fuel: Purchase gasoline from reputable stations to minimize contaminants and water in your fuel.
- Fuel System Treatments: Periodic use of fuel system cleaners can help maintain cleanliness throughout the system.
- Avoid Running on Empty: Keeping your tank above one-quarter full reduces the chance of sucking sediment from the bottom of the tank into the fuel system .
Table: Fuel Pressure Regulator Cleaning Methods Comparison
| Method | Effectiveness | Cost | Difficulty | Best For |
|---|---|---|---|---|
| Complete Disassembly & Cleaning | Very High | $ (cleaning supplies only) | Moderate to High | Seriously clogged regulators, optimal results |
| Fuel Additives | Low to Moderate | $ | Easy | Preventive maintenance, mild cases |
| Professional Service | High | $$$ | Easy (but requires professional) | Those uncomfortable with DIY, complex cases |
Troubleshooting Common Cleaning Challenges
Even with careful work, you might encounter issues during or after cleaning your fuel pressure regulator.
Regulator Doesn’t Come Clean
Some regulators have internal components that can’t be adequately cleaned, particularly if:
- Heavy Varnish Buildup: Stubborn deposits may require prolonged soaking in specialized solvents.
- Internal Corrosion: If the internal mechanisms are corroded, cleaning may not restore proper function, necessitating replacement.
- Non-Serviceable Designs: Some modern regulators are not designed to be disassembled and cleaned—if malfunctioning, they must be replaced.
Post-Cleaning Performance Issues
If problems persist after cleaning:
- Verify Regulator Function: Test fuel pressure with a gauge to confirm the regulator is maintaining proper pressure .
- Check for Other Issues: The original symptoms might have been caused by other problems like a weak fuel pump, clogged filter, or failing injectors.
- Inspect Vacuum Connections: Ensure the vacuum line to the regulator is intact and connected properly, as leaks can affect regulator operation.
- Look for Installation Errors: Double-check that all connections are secure and there are no fuel leaks.
When to Replace Instead of Clean
Cleaning isn’t always the solution. Consider replacement if:
- The regulator shows visible damage, cracks, or heavy corrosion.
- The internal diaphragm is torn or damaged (if accessible for inspection).
- Cleaning doesn’t resolve performance issues.
- You have a returnless system where the regulator is part of the fuel pump module.
- The regulator is old and has likely reached the end of its service life.
Conclusion
Learning how to clean fuel pressure regulator components properly is a valuable skill that can save you significant money while restoring your vehicle’s performance and efficiency. While the process requires careful attention to safety and detail, most DIY enthusiasts with basic mechanical skills can successfully complete the task with the right guidance and preparation. Remember that symptoms of a dirty fuel pressure regulator often mimic other fuel system issues, so proper diagnosis is essential before beginning work. Regular maintenance, including periodic inspection and cleaning of your fuel pressure regulator as part of your overall fuel system care, can prevent many common driveability issues and extend the life of your vehicle’s engine. Whether you choose to tackle the cleaning yourself or opt for professional service, addressing regulator issues promptly will ensure your vehicle continues to run smoothly and efficiently for years to come.
Key Takeaways
- A clean, properly functioning fuel pressure regulator is essential for optimal engine performance, fuel economy, and emissions control.
- Common symptoms of a dirty regulator include engine hesitation, poor fuel economy, black smoke from the exhaust, and hard starting.
- Safety precautions, particularly relieving fuel system pressure and working in a well-ventilated area, are non-negotiable when cleaning a fuel pressure regulator.
- Methodical disassembly, thorough cleaning with appropriate solvents, and careful reassembly with new seals are crucial for successful regulator cleaning.
- Regular preventive maintenance, including quality fuel and periodic fuel system cleaning, can help prevent regulator contamination and extend its service life.
Sources
- High Performance Academy: Symptoms Of A Bad Fuel Pressure Regulator
- QuickBitz: The Need and Tips to Clean Your Fuel Pressure Regulator!
- AlfaOwner Forum: Cleaning Fuel Pressure Regulator?
- OTC Tools: Fuel Injector Cleaning Kit
- Run-Rite: D.T.I. (Direct Thru Injector) Cleaning Tool
- Fleet Rabbit: How to Clean Fuel Injectors and Maintain Fuel Systems


Jump Starter with Air Compressor, 8000A Car Battery Jump Starter (9.0 Gas/8.0L Diesel), 180PSI Car Battery Jumper Starter Portable 12V Jump Box with Jumper Cables, LED Light, Power Bank, LCD Display
$49.98 (as of March 25, 2026 11:31 GMT +00:00 - More infoProduct prices and availability are accurate as of the date/time indicated and are subject to change. Any price and availability information displayed on [relevant Amazon Site(s), as applicable] at the time of purchase will apply to the purchase of this product.)


Cerakote Rapid Ceramic Plastic Restorer and Protectant - 50 Wash Rating - Protects New Trim - Restores Faded Plastic - Non-Greasy Finish - Ceramic Spray Coating for Cars and Trucks
$12.65 (as of March 25, 2026 11:31 GMT +00:00 - More infoProduct prices and availability are accurate as of the date/time indicated and are subject to change. Any price and availability information displayed on [relevant Amazon Site(s), as applicable] at the time of purchase will apply to the purchase of this product.)


TRQ Front Ceramic Brake Pad and Rotor Kit Compatible with 2015-2019 Hyundai Sonata 2015-2020 Kia Optima 2021-2024 Hyundai Kona Electric - Verify Fitment & Trim
$139.95 (as of March 25, 2026 05:01 GMT +00:00 - More infoProduct prices and availability are accurate as of the date/time indicated and are subject to change. Any price and availability information displayed on [relevant Amazon Site(s), as applicable] at the time of purchase will apply to the purchase of this product.)


Dupli-Color Perfect Match Premium Automotive Paint, Bright Platinum (M), 8 oz
$7.78 (as of March 25, 2026 09:35 GMT +00:00 - More infoProduct prices and availability are accurate as of the date/time indicated and are subject to change. Any price and availability information displayed on [relevant Amazon Site(s), as applicable] at the time of purchase will apply to the purchase of this product.)


121PCS Push Type Retainer Clips, for Honda Accord Civic, CR-V, Crosstour, Fit, HR-V, Insight, Odyssey, Passport. Fits Acura ILX, MDX, RDX, RLX Fender Liner/Bumper/Splash Shield Clips, 4 Sizes + Tool
$8.99 (as of March 25, 2026 11:13 GMT +00:00 - More infoProduct prices and availability are accurate as of the date/time indicated and are subject to change. Any price and availability information displayed on [relevant Amazon Site(s), as applicable] at the time of purchase will apply to the purchase of this product.)


Qifflilk Car Scratch Remover, All Cars Magic Pen, Scratch Remover for Vehicles, Lightweight and Fast,Long-Lasting,Effective Performance, Black Car Paint Scratch Repair 2pcs
$18.49 (as of March 25, 2026 09:35 GMT +00:00 - More infoProduct prices and availability are accurate as of the date/time indicated and are subject to change. Any price and availability information displayed on [relevant Amazon Site(s), as applicable] at the time of purchase will apply to the purchase of this product.)


Rain-X 810363 Repellency Water Repellent Wiper Blades, 22" Windshield Wipers (Pack of 2), All Weather Streak-Free for Enhanced Visibility w/Water Repellency Formula [Amazon Exclusive]
$42.40 (as of March 25, 2026 10:47 GMT +00:00 - More infoProduct prices and availability are accurate as of the date/time indicated and are subject to change. Any price and availability information displayed on [relevant Amazon Site(s), as applicable] at the time of purchase will apply to the purchase of this product.)


Mobil 1 Advanced Fuel Economy Full Synthetic Motor Oil 0W-20, 5 Quart
$27.97 (as of March 25, 2026 10:10 GMT +00:00 - More infoProduct prices and availability are accurate as of the date/time indicated and are subject to change. Any price and availability information displayed on [relevant Amazon Site(s), as applicable] at the time of purchase will apply to the purchase of this product.)


Valvoline Advanced Full Synthetic SAE 0W-20 Motor Oil 5 QT
$26.97 (as of March 25, 2026 10:47 GMT +00:00 - More infoProduct prices and availability are accurate as of the date/time indicated and are subject to change. Any price and availability information displayed on [relevant Amazon Site(s), as applicable] at the time of purchase will apply to the purchase of this product.)